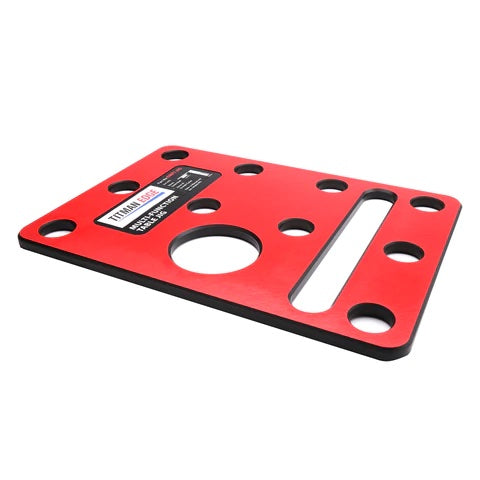
The Multi-Function Table Jig That is Made in the UK - The EMFT Jig
MFT Jig for Making Your Own Multi-Function Tabletop
So you've been looking online at a few different multi-function tabletop jigs. First, you've perhaps gone to various different router jig manufacturer's website, then maybe wandered through eBay. You might've even sniffed around Festool's multi-function table for a while, before feeling slightly sick when you saw the price.
And now you've ended up on our blog post, where we'll talk in-depth about the EMFT Jig, by Titman Edge.
In this guide we'll show you why adding the EMFT Jig to your kit is the most cost-effective way to make your own multi-function table, to your own specification, as often as you like.
Almost all MFT jigs, that are worth their weight in salt at least, are manufactured out of high-pressure laminate (HPL). And there's a reason for that, it's the real deal. Without getting too technical, high-pressure laminate is developed through layering together multiple resin-impregnated sheets, which are bonded under the effects of heat and pressure. The final product is considered to be one of the most durable decorative surface materials available today.
Have a look at the EMFT Jig for yourself here.
Why High-Pressure Laminate?
All of the previous jigs you were looking at, the ones with the big bucks attached to them, would've been carved from HPL. Mainly for a few simple, but imperative reasons. High-pressure laminate offers an incredible amount of resistance against impact, abrasion, and general wear and tear.
So, for example, if you were to chuck your HPL jig in the back of the van before you drive home from the worksite, you don't have to be too worried about stuff clattering off it. There's nothing worse than having to babysit your equipment and fret and fuss over how it's handled.
It's made to last and was designed to be a one time purchase.
The EMFT Jig - Specifications
At EveryTool we look to sell and stock the best possible equipment available. And of course, the jigs we choose to sell are no different. Titman Edge prioritises British made products.
All of their router bits are manufactured in the UK... and so are their jigs. As we said, it's made to last, so when you have to replace your MFT table a few years down the line the jig will still be able to do the job. Buy British.
Something to note about the EMFT jig right off the bat. It comes packaged with four locator aluminium dogs; so none of that "buy separately" type deal. Once it arrives you can start planning and routing your MFT table that day.
The size of the entire jig itself is 350mm x 250mm, making it portable, and easier to move once set up on the MDF. Each required hole that is routed to comprise of the MFT table itself has an aperture of 20mm; we recommend using the Titman Edge 46DHTC 20mm diameter plunge router cutter. You will need a 30mm guide bush on your router to make sure there are no imperfections.

There are a few interesting specifications that set the EMFT jig apart from its cousins on the market.
There's an aperture that is designed to hold travel mugs (75mm) and another one that allows you to create a groove that can stop pencils and screws from rolling around; if you would like to create a slight groove then the Titman Edge E056AHTC radius cove cutter is up to the task. Or, if you want to be able to carry the table with you, the aperture that creates the pencil groove can be routed straight through to create a handle. These aren't imperative to the table itself but are little quality of life additions that will hopefully help you in the long-run.
EMFT Jig - How to Set Up and Use
The supplied locator dogs, along with a good pair of clamps will make the job a breeze. Being precise and double-checking when needed will ensure even spacing between each routed hole. But we're not going to tell you how to suck eggs, rather give a brief breakdown of the process you can take.
- Place the four indexing pins into the jig and clamp the jig on your workpiece so that you have 6 of the 20mm aperture holes above the MDF board.
- Be sure there is somewhere for the cutter to go before you begin routing. May it be some waste material or enough space so that the blade doesn't bore into anything special.
- Fit the guide bush to your router, along with the bit, and begin plunging into the 6 holes placed above the MDF. Bore through the 6 holes available.
- Remove clamps and move the jig, and fit the locator dogs into the holes just cut. Now go back to stage 3, route through the available holes. And keep the process of stage 3 and 4 going. Periodically check with a square that you are keeping a 90 degrees pattern.
- If you wish to use the pencil, or cup holder aperture, place the jig in the desired position, clamp, and rout out. Partially through for the pencil holder, all the way if you wish to turn it into a grab handle. For the cup holder always rout all the way through.

